Python scripting
Python API
Retrieving a source
There is two ways to retrieve a Source.
The first one is by specifying the name of the source. In case several sources have the same name, a second parameter specifying the source position allows to desembiguate.
my_source = squey.source("name_of_the_source")
my_source = squey.source("name_of_the_source", 3)
The second one is by specifying the index of the source. It is sometime more convenient, but can be misleading when the script is executed from the format because the index can change depending on how many sources are already loaded.
my_source = squey.source(0)
Retrieving a column
There is also two ways to retrieve a Column from a Source.
The first one is by specifying the name of the column. In case several columns have the same name, a second parameter specifying the column position allows to desembiguate.
my_column = my_source.column("name_of_the_column")
my_column = my_source.column("name_of_the_column", 1)
The second one is by specifying the index of the column. It is sometime more convenient, but can be misleading because the index can change depending on the position of the column.
my_column = my_source.column(0)
Note
Columns are exposed as NumPy arrays directly from the underlying data so that no memory copy occured (except for string columns). In the case of string column, you can avoid the memory allocation by retrievied both the string dictionnary and the array of IDs.
column_dict = source.column(0, squey.string_as.dict)
column_ids = source.column(0, squey.string_as.id)
for i in range(column_ids.size):
    print(column_dict[column_ids[i]])
Retrieving the type of a column
The type of a column (NumPy dtype string) can be retrieved as a much like a column is retrieved. In case several columns have the same name, a second parameter specifying the column index allows to desembiguate (0-based on the number of columns of the same name).
my_column_type = my_source.column_type("column_name")
my_column_type = my_source.column_type("column_name", index)
my_column_type = my_source.column_type(0)
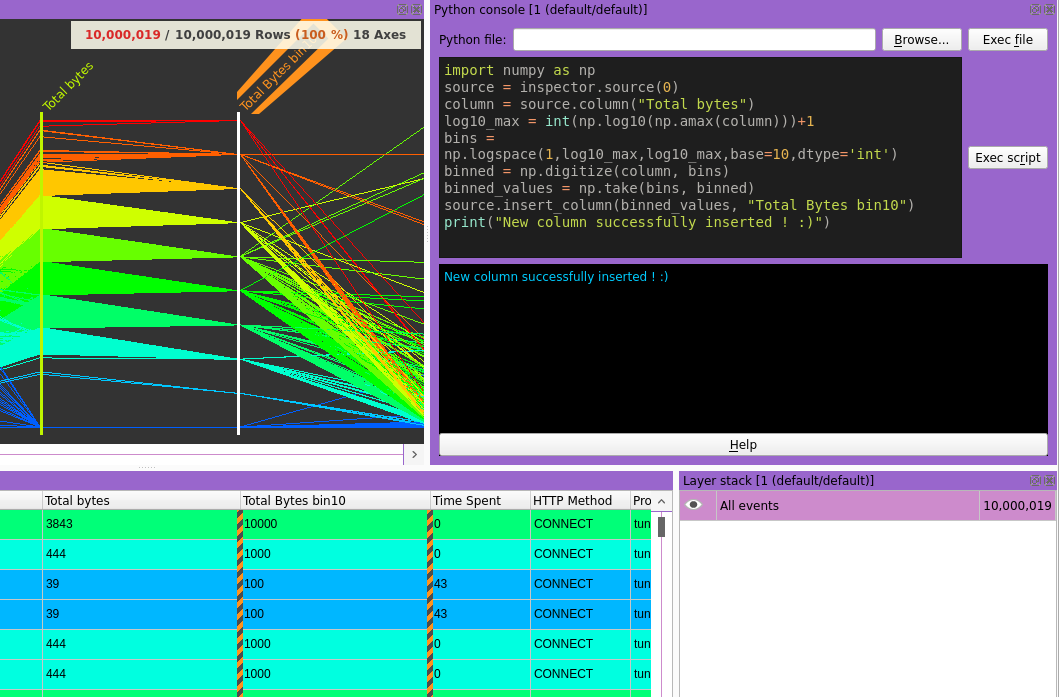
Inserting a column
my_source.insert_column(new_column, "My new column")
Deleting a column
Deleting a column from the disk is possible using the “delete_column” method on a source object. In case several columns have the same name, a second parameter specifying the column index allows to desembiguate (0-based on the number of columns of the same name).
my_source.delete_column("My column")
my_source.delete_column("My column", index)
Retrieving a selection
There is also two ways to retrieve a selection from a Source.
The first one is by specifying the name of the layer In case several layers have the same name, a second parameter specifying the layer index allows to desembiguate (0-based on the number of layers of the same name).
my_selection = my_source.selection("layer_name")
my_selection = my_source.selection("layer_name", index)
The second one is by specifying the index of the layer. It is sometime more convenient, but can be misleading because the index can change depending on the position of the layer :
my_selection = my_source.selection(0)
If no parameter is specified (or -1), then the current selection is returned.
Using a selection
“get()” and “set()” index-based methods can be used on the selection object in order to inspect the selected rows or change them.
print(my_selection.get(203764965))
True
source = squey.source(0)
selection = source.selection()
for i in range(selection.size()):
    selection.set(i, i % 10)
The drawback of these methods are the performance : iterating in Python over a large array tend to be really slow !
To dramatically speed up the selection modification, you can use the “set()” and “get()” methods that are using a NumPy array of “bool” to represent the selection.
import numpy as np
source = squey.source(0)
new_selection = np.fromfunction(lambda i: i % 10 == False, (source.row_count(),))
selection = source.selection()
selection.set(new_selection)
Note
the “get()” method is returning a copy of the selection and any change over this object will not update the current selection.
The “data()” method can also be used to retrived the bitfield of the selection object as a buffer of unsigned 64 bits values packing the bits.
bitfield = my_source.selection("layer_name").data()
Creating layers
Inserting a new layer can be done using the “insert_layer()” method on a “source” object providing the name of the layer and a selection array
import numpy as np
source = squey.source(0)
new_selection = np.fromfunction(lambda i: i % 10 == False, (source.row_count(),))
source.insert_layer("new layer", new_selection)
Note
If no selection array is supplied, the current selection is used.
source.insert_layer("layer_name")
User interraction
Python scripts can be made interractive by retrieving user provided values using dialogs thanks to the following methods :
integer = squey.input_integer(variable_name = "integer", title_name = "input integer", value = 0, min = -2147483647, max = 2147483647, step = 1)
double = squey.input_double(variable_name = "double", title_name = "input double", value = 0.0, min = -2147483647, max = 2147483647, decimals = 1)
text = squey.input_text(variable_name = "text", title_name = "input text", value = "")
item_text = squey.input_item(items = [], selected_index = 0, variable_name = "item", title_name = "input item")
Note
Each parameter is optional.
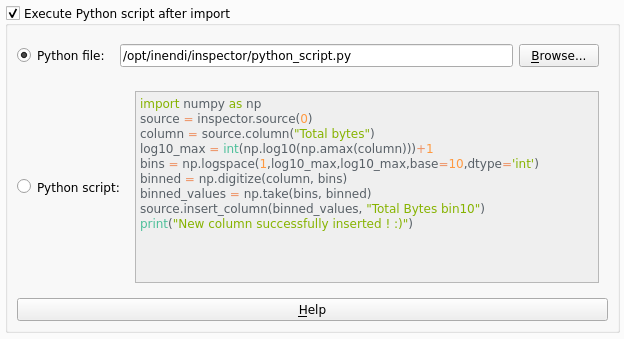
Executing Python script after import
You can use the python scripting widget available in the format builder to specify a script file or a script content to be executed after the data is imported.
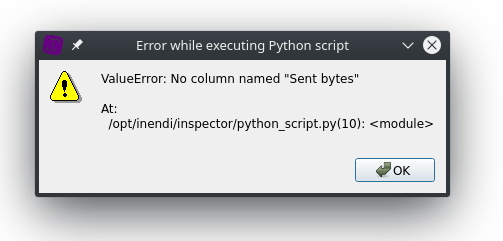
Any error encountered during the script execution will be displayed in a message box :
Installing Python modules
flatpak run --command=/app/bin/squey_sh org.squey.Squey
pip3 install <module_name>
If you want to install hardware accelerated modules that need system libraries (eg. cupy needs CUDA), you can load them in a custom directory :
flatpak run --command=bash --env="LD_LIBRARY_PATH=/opt/squey/squey/cuda-10.0/lib64" org.squey.Squey
pip3 install cupy-cuda100
Note
If you are running the application through a container, you first have to enter the container :
podman exec -it squey bash
Warning
You will need to reinstall your modules when the version of Python is upgraded between major versions.